What are you looking for?

Search results will appear here

TAG: Shade

In the early 1900s, before the invention of modern air conditioning, Edwardians had to get creative in order to keep their homes cool during the sweltering summer months. From utilizing natural ventilation to strategic furniture placement, there were a variety of tactics that could be employed to create a more comfortable indoor environment.

**1. Cross-ventilation:** One of the simplest and most effective ways to cool a home in the summer was to take advantage of natural cross-ventilation. By opening windows on opposite sides of the house, Edwardians could create a breeze that would help to circulate air and lower the temperature inside.

**2. Window treatments:** Heavy curtains and drapes were often used to block out the sun’s rays and keep rooms cool. By keeping windows covered during the hottest parts of the day, Edwardians could prevent excess heat from entering their homes.

**3. Shades and awnings:** In addition to curtains, shades and awnings were also used to provide shade and reduce the amount of sunlight that entered a room. By installing external shades or awnings on windows, Edwardians could keep their homes cooler without sacrificing natural light.

**4. Planting trees:** Planting trees strategically around the home could help to provide natural shade and reduce the amount of heat that entered the building. Trees also have the added benefit of absorbing carbon dioxide and releasing oxygen, which can help to improve air quality.

**5. Use of fans:** Electric fans were becoming more common in Edwardian homes, and were a popular way to circulate air and create a cooling breeze. Ceiling fans were also used to help distribute air more evenly throughout a room.

In addition to these strategies, Edwardians also employed a number of other techniques to keep their homes cool in the summer. One popular method was to use ice or ice blocks to cool the air. Ice could be placed in front of a fan or in a bowl of water to help lower the temperature in a room.

**6. Porches and verandas:** Many Edwardian homes were equipped with porches or verandas, which provided a shaded outdoor space where residents could relax and enjoy the cooler evening air. Porches were often furnished with wicker furniture or rocking chairs, making them a popular spot for socializing with friends and family.

**7. Strategic furniture placement:** Edwardians were careful about where they placed their furniture, particularly in relation to windows and doors. By keeping furniture away from direct sunlight and ensuring that there was plenty of space for air to circulate, they could help to maintain a cooler indoor environment.

**8. Light-colored decor:** Light-colored walls, furniture, and decor were favored by Edwardians for their ability to reflect sunlight and create a brighter, cooler space. Dark colors, on the other hand, absorb heat and can make a room feel warmer.

In conclusion, Edwardians used a combination of natural ventilation, window treatments, shade, and strategic design choices to keep their homes cool in the summer. By being resourceful and creative, they were able to create a comfortable living environment without the need for modern air conditioning.

70+ Bee Nail Designs for Buzzworthy Nails


Creating bee nail designs is a fun and unique way to show off your love for these buzzy creatures. Whether you’re a beekeeper, nature enthusiast, or just appreciate their important role in the ecosystem, bee nail designs are a great way to make a statement. Here are over 70 bee nail designs to inspire your next manicure:

Classic Bee Nail Designs


1. Start by painting your nails with a yellow base color.
2. Use black nail polish to create stripes on your nails to mimic a bee’s abdomen.
3. Add white dots to represent the bee’s wings.
4. Finish off with a small black dot for the bee’s head.

Abstract Bee Nail Designs


1. Paint each nail a different shade of yellow, black, or white.
2. Use a thin brush to create abstract bee-inspired designs on each nail.
3. Play around with different patterns and shapes to create a unique look.

Honeycomb Nail Designs


1. Start by painting your nails with a nude or yellow base color.
2. Use a thin brush to create honeycomb patterns on each nail using black nail polish.
3. Add small gold or yellow dots to represent honey in the honeycomb.
4. Finish off with a glossy top coat to give your nails a shiny finish.

3D Bee Nail Designs


1. Start by painting your nails with a yellow base color.
2. Use black nail polish to create a 3D bee design on one or two of your nails.
3. You can use small rhinestones or nail art stickers to create the bee’s wings and stripes.
4. Finish off with a clear top coat to seal in your design.

Gradient Bee Nail Designs


1. Paint each nail with a gradient of yellow and black nail polish.
2. Use a sponge to create a smooth transition between the two colors.
3. Add a bee-inspired accent nail using black and white nail polish.
4. Finish off with a matte top coat for a modern look.

Glitter Bee Nail Designs


1. Start by painting your nails with a yellow or black base color.
2. Use glitter nail polish to create a sparkly bee design on one or two of your nails.
3. You can add rhinestones or glitter accents to enhance your bee design.
4. Finish off with a glossy top coat to make your nails shine.

French Tip Bee Nail Designs


1. Paint your nails with a clear base coat.
2. Use yellow nail polish to create a French tip on each nail.
3. Add black stripes and white dots to mimic a bee’s body and wings.
4. Finish off with a clear top coat to seal in your design.

Watercolor Bee Nail Designs


1. Paint each nail with a white base color.
2. Use watercolor nail polish to create a bee-inspired design on each nail.
3. Play around with different colors and patterns to create a unique watercolor effect.
4. Finish off with a clear top coat to protect your design.

Conclusion


Next time you’re looking to spice up your manicure, consider trying out one of these bee nail designs. Whether you’re a beginner or a nail art expert, there’s a bee-inspired design for everyone. Show off your love for these important pollinators with buzzworthy nails that will surely turn heads.

Cute Short Thanksgiving Nails Ideas


1. Turkey Nails


Start by painting your nails in a neutral shade like beige or brown. Then, use a nail art brush to create turkey feathers on one nail, and add a cute turkey face on another nail. Finish off with some orange and red dots for the turkey’s feathers.


2. Pumpkin Spice Nails


For this look, paint your nails in a warm orange shade. Next, use a nail art brush to create little pumpkin designs on each nail. Add some brown and green accents to complete the pumpkin spice look.


3. Fall Leaves Nails


Paint your nails in a dark green or burgundy shade, then use a nail art brush to create different colored fall leaves on each nail. Add some gold glitter accents for a touch of sparkle.


4. Cornucopia Nails


Start by painting your nails in a deep purple shade. Then, use a nail art brush to create a cornucopia design on one nail, filled with fall fruits and vegetables. Add some gold accents for a festive touch.


5. Acorn Nails


Paint your nails in a light brown shade, then use a nail art brush to create little acorn designs on each nail. Add some gold glitter accents for a touch of glam.


6. Thanksgiving Feast Nails


For this fun look, paint each nail a different color to represent different Thanksgiving foods like turkey, mashed potatoes, cranberry sauce, and pumpkin pie. Add some cute food designs with a nail art brush for a festive touch.


How to Achieve These Cute Short Thanksgiving Nails


  1. Start by prepping your nails – trim, shape, and buff them.

  2. Apply a base coat to protect your nails.

  3. Paint your nails in a shade that matches your chosen Thanksgiving design.

  4. Use a nail art brush to create your desired design on each nail.

  5. Add any additional accents like glitter or rhinestones.

  6. Finish off with a top coat to seal in your design and add shine.


With these cute short Thanksgiving nails, you’ll be ready to celebrate the holiday in style. Whether you choose a turkey, pumpkin spice, or fall leaves design, your nails will be the perfect finishing touch to your Thanksgiving look. Have fun with these festive nail designs and show off your holiday spirit!
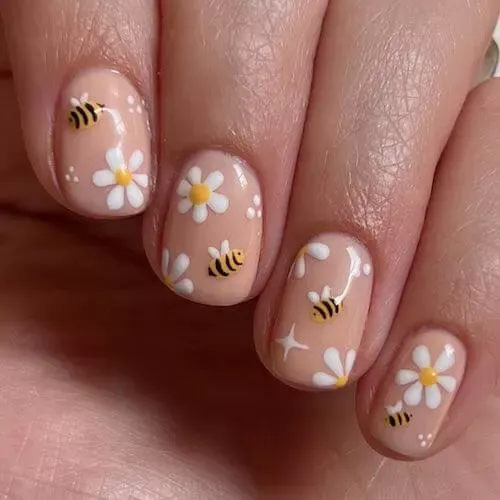
Introduction


Neutral nails are a timeless and classy choice for any occasion. Whether you’re going for a minimal aesthetic or just want a chic look, neutral nails are the perfect choice. In this article, we will explore 21+ chic neutral nail designs that will elevate your style and give you a polished look.


1. Nude Matte Nails


Start by applying a nude matte nail polish to your nails. This will give you a sleek and sophisticated look that is perfect for any occasion. To achieve this look, simply apply two coats of nude matte nail polish and finish with a glossy top coat for a long-lasting finish.


2. Beige French Tips


Create a classic French manicure with a twist by using beige nail polish for the tips. This subtle change adds a modern touch to a timeless look. Simply apply a beige nail polish to the tips of your nails and finish with a top coat for a glossy finish.


3. Taupe Ombre Nails


Give your nails a chic and trendy look with taupe ombre nails. Start by applying a light taupe nail polish to the base of your nails and gradually fade it into a darker taupe shade towards the tips. Finish with a glossy top coat for a polished finish.


4. Grey Marble Nails


Create a sophisticated and stylish look with grey marble nails. Start by applying a light grey nail polish to your nails and use a nail art brush to create marble-like swirls with a darker grey shade. Finish with a top coat for a glossy finish.


5. Muted Lavender Nails


Add a pop of color to your neutral nails with muted lavender. This subtle shade adds a touch of femininity to your look while still maintaining a chic and classy vibe. Simply apply two coats of muted lavender nail polish and finish with a top coat for a glossy finish.


6. Nude and Gold Accents


Elevate your neutral nails with gold accents for a touch of glamour. Start by applying a nude nail polish to your nails and add gold accents using nail art foil or nail stickers. Finish with a top coat for a long-lasting finish.


7. Creamy White Nails


Opt for a clean and minimal look with creamy white nails. This timeless shade is perfect for any occasion and complements any outfit. Simply apply two coats of creamy white nail polish and finish with a top coat for a glossy finish.


8. Soft Pink Nails


Add a touch of softness to your neutral nails with a light pink shade. This subtle color adds a feminine touch to your look while still maintaining a chic and classy vibe. Simply apply two coats of soft pink nail polish and finish with a top coat for a polished finish.


9. Nude and Black French Tips


Create a modern French manicure with nude and black tips for a bold and chic look. Start by applying a nude nail polish to the base of your nails and add black tips for a contrasting look. Finish with a top coat for a glossy finish.


10. Beige and Gold Geometric Nails


Add a touch of sophistication to your neutral nails with beige and gold geometric designs. Start by applying a beige nail polish to your nails and use a nail art brush to create geometric shapes with gold nail polish. Finish with a top coat for a polished finish.


Conclusion


Neutral nails are a versatile and chic choice for any occasion. Whether you prefer a minimal aesthetic or want to add a touch of glamour, there are endless options to choose from. Try out these 21+ chic neutral nail designs to elevate your style and achieve a polished look.

×Optimized Ad
×Optimized Ad