What are you looking for?

Search results will appear here

TAG: pStart

Cute Short Thanksgiving Nails Ideas


1. Turkey Nails


Start by painting your nails in a neutral shade like beige or brown. Then, use a nail art brush to create turkey feathers on one nail, and add a cute turkey face on another nail. Finish off with some orange and red dots for the turkey’s feathers.


2. Pumpkin Spice Nails


For this look, paint your nails in a warm orange shade. Next, use a nail art brush to create little pumpkin designs on each nail. Add some brown and green accents to complete the pumpkin spice look.


3. Fall Leaves Nails


Paint your nails in a dark green or burgundy shade, then use a nail art brush to create different colored fall leaves on each nail. Add some gold glitter accents for a touch of sparkle.


4. Cornucopia Nails


Start by painting your nails in a deep purple shade. Then, use a nail art brush to create a cornucopia design on one nail, filled with fall fruits and vegetables. Add some gold accents for a festive touch.


5. Acorn Nails


Paint your nails in a light brown shade, then use a nail art brush to create little acorn designs on each nail. Add some gold glitter accents for a touch of glam.


6. Thanksgiving Feast Nails


For this fun look, paint each nail a different color to represent different Thanksgiving foods like turkey, mashed potatoes, cranberry sauce, and pumpkin pie. Add some cute food designs with a nail art brush for a festive touch.


How to Achieve These Cute Short Thanksgiving Nails


  1. Start by prepping your nails – trim, shape, and buff them.

  2. Apply a base coat to protect your nails.

  3. Paint your nails in a shade that matches your chosen Thanksgiving design.

  4. Use a nail art brush to create your desired design on each nail.

  5. Add any additional accents like glitter or rhinestones.

  6. Finish off with a top coat to seal in your design and add shine.


With these cute short Thanksgiving nails, you’ll be ready to celebrate the holiday in style. Whether you choose a turkey, pumpkin spice, or fall leaves design, your nails will be the perfect finishing touch to your Thanksgiving look. Have fun with these festive nail designs and show off your holiday spirit!

Introduction


Are you looking for some buzzworthy nail designs that will make a statement? Look no further than these 70+ bee nail designs for 2023! Whether you’re a fan of bold and colorful designs or prefer something more subtle and elegant, there’s something for everyone in this collection. From intricate hand-painted designs to simple and chic patterns, these bee-inspired nail designs are sure to create a buzz wherever you go.


How to Achieve Buzzworthy Nails


Here’s how you can achieve these buzzworthy nail designs:


1. Gather Your Supplies


  • Nail polish in yellow, black, and white

  • Nail art brushes

  • Nail stickers or stencils

  • Top coat


2. Prep Your Nails


Start by shaping and buffing your nails to create a smooth surface for your nail designs. Apply a base coat to protect your nails and help the nail polish adhere better.


3. Choose Your Design


Whether you want to go for a full-on bee-themed manicure or just add a subtle bee accent nail, the choice is yours. You can opt for a classic black and yellow striped design, a cute cartoon bee, or even a more abstract honeycomb pattern.


4. Get Creative


Use your nail art brushes to create intricate designs or use nail stickers or stencils for a quick and easy way to achieve a bee-inspired look. Don’t be afraid to mix and match different patterns and colors to create a unique and eye-catching manicure.


5. Finish with a Top Coat


Once you’re happy with your bee nail design, finish it off with a top coat to seal in your design and add a glossy finish. This will help your manicure last longer and protect your nails from chipping.


70+ Bee Nail Designs for 2023


Now that you know how to achieve buzzworthy nails, here are 70+ bee nail designs to inspire your next manicure:


1. Black and Yellow Stripes


For a classic bee-inspired look, opt for black and yellow striped nails. You can alternate between thick and thin stripes or create a gradient effect for a modern twist.


2. Cartoon Bee


Add a cute and whimsical touch to your manicure with a cartoon bee design. You can paint a bee on one nail or create a whole swarm of bees on each nail for a fun and playful look.


3. Honeycomb Pattern


Create a chic and sophisticated manicure with a honeycomb pattern. Use a nail art brush to paint intricate honeycomb shapes on your nails or opt for a honeycomb nail sticker for a quick and easy design.


4. Beehive Nails


Channel your inner queen bee with a beehive nail design. Paint tiny beehives on each nail or create a 3D effect with raised beehive accents for a unique and eye-catching look.


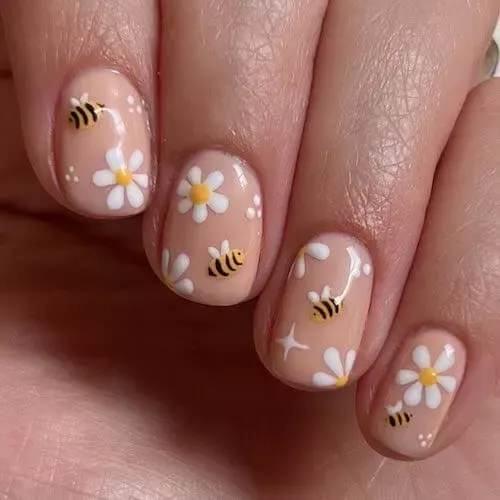
5. Floral and Bee Accents


Add a touch of nature to your manicure with floral and bee accents. Paint delicate flowers on some nails and add a bee accent nail for a whimsical and romantic look.


6. Glittery Bee Wings


Add some sparkle to your bee nail design with glittery bee wings. Use gold or silver glitter polish to create shimmery bee wings on each nail for a glamorous and festive look.


7. Abstract Bee Art


Show off your artistic side with abstract bee nail art. Use bold colors and geometric shapes to create a modern and edgy bee-inspired design that will make a statement.


8. Bumblebee French Tips


Put a twist on the classic French manicure with bumblebee French tips. Paint black and yellow tips on each nail and add a small bee accent near the cuticle for a chic and trendy look.


9. Buzzing Bee Stripes


Create a dynamic and eye-catching manicure with buzzing bee stripes. Paint black and yellow stripes on each nail and add small bees flying between the stripes for a playful and whimsical design.


10. Bee and Flower Mosaic


Create a stunning mosaic design with bees and flowers. Paint tiny bees and flowers on each nail and add small dots and lines to create a mosaic effect for a colorful and intricate manicure.


With so many bee nail designs to choose from, you’re sure to find the perfect manicure to suit your style and personality. Whether you prefer a simple and elegant look or want to make a bold statement, these bee-inspired nail designs are sure to turn heads and create a buzz wherever you go.

If you have been looking for ways to tighten your skin without using harsh chemicals or undergoing expensive treatments, this homemade wrinkle cream is perfect for you. Made with all-natural ingredients, this cream is not only effective but also safe for your skin. Say goodbye to wrinkles and hello to smoother, tighter skin with this DIY remedy.

Benefits of Homemade Wrinkle Cream:


  • Natural ingredients

  • No harsh chemicals

  • Affordable

  • Effective results


Ingredients:


  • 1/2 cup of organic coconut oil

  • 2 tablespoons of organic honey

  • 1 tablespoon of vitamin E oil

  • 1 tablespoon of almond oil

  • 1 teaspoon of lemon essential oil


Instructions:


Start by melting the coconut oil in a double boiler until it becomes a liquid. Once melted, remove it from the heat and add the honey, vitamin E oil, almond oil, and lemon essential oil. Mix well until all the ingredients are combined. Let the mixture cool for a few minutes before transferring it to a clean glass jar.


Apply a small amount of the cream to your skin in upward strokes, focusing on areas with fine lines and wrinkles. Use it daily for best results. The coconut oil will help hydrate and plump your skin, while the honey and vitamin E oil will help tighten and firm it. The almond oil and lemon essential oil will help brighten and rejuvenate your skin, giving you a youthful glow.


Results:


  • Smoother skin

  • Tighter skin

  • Reduced wrinkles

  • Youthful glow


With regular use, you will start to notice a significant improvement in the texture and appearance of your skin. This homemade wrinkle cream is a natural and effective alternative to Botox, without any of the side effects. Say goodbye to expensive treatments and hello to radiant, youthful skin with this DIY remedy!


So why wait? Try this homemade wrinkle cream today and see the amazing results for yourself. Your skin will thank you for it!


By using this homemade wrinkle cream, you can achieve tighter, smoother skin without the need for expensive treatments or harsh chemicals. Made with all-natural ingredients, this DIY remedy is safe and effective for all skin types. Say goodbye to wrinkles and hello to radiant, youthful skin with this powerful homemade cream.

Introduction


Neutral nails are a timeless and classy choice for any occasion. Whether you’re going for a minimal aesthetic or just want a chic look, neutral nails are the perfect choice. In this article, we will explore 21+ chic neutral nail designs that will elevate your style and give you a polished look.


1. Nude Matte Nails


Start by applying a nude matte nail polish to your nails. This will give you a sleek and sophisticated look that is perfect for any occasion. To achieve this look, simply apply two coats of nude matte nail polish and finish with a glossy top coat for a long-lasting finish.


2. Beige French Tips


Create a classic French manicure with a twist by using beige nail polish for the tips. This subtle change adds a modern touch to a timeless look. Simply apply a beige nail polish to the tips of your nails and finish with a top coat for a glossy finish.


3. Taupe Ombre Nails


Give your nails a chic and trendy look with taupe ombre nails. Start by applying a light taupe nail polish to the base of your nails and gradually fade it into a darker taupe shade towards the tips. Finish with a glossy top coat for a polished finish.


4. Grey Marble Nails


Create a sophisticated and stylish look with grey marble nails. Start by applying a light grey nail polish to your nails and use a nail art brush to create marble-like swirls with a darker grey shade. Finish with a top coat for a glossy finish.


5. Muted Lavender Nails


Add a pop of color to your neutral nails with muted lavender. This subtle shade adds a touch of femininity to your look while still maintaining a chic and classy vibe. Simply apply two coats of muted lavender nail polish and finish with a top coat for a glossy finish.


6. Nude and Gold Accents


Elevate your neutral nails with gold accents for a touch of glamour. Start by applying a nude nail polish to your nails and add gold accents using nail art foil or nail stickers. Finish with a top coat for a long-lasting finish.


7. Creamy White Nails


Opt for a clean and minimal look with creamy white nails. This timeless shade is perfect for any occasion and complements any outfit. Simply apply two coats of creamy white nail polish and finish with a top coat for a glossy finish.


8. Soft Pink Nails


Add a touch of softness to your neutral nails with a light pink shade. This subtle color adds a feminine touch to your look while still maintaining a chic and classy vibe. Simply apply two coats of soft pink nail polish and finish with a top coat for a polished finish.


9. Nude and Black French Tips


Create a modern French manicure with nude and black tips for a bold and chic look. Start by applying a nude nail polish to the base of your nails and add black tips for a contrasting look. Finish with a top coat for a glossy finish.


10. Beige and Gold Geometric Nails


Add a touch of sophistication to your neutral nails with beige and gold geometric designs. Start by applying a beige nail polish to your nails and use a nail art brush to create geometric shapes with gold nail polish. Finish with a top coat for a polished finish.


Conclusion


Neutral nails are a versatile and chic choice for any occasion. Whether you prefer a minimal aesthetic or want to add a touch of glamour, there are endless options to choose from. Try out these 21+ chic neutral nail designs to elevate your style and achieve a polished look.

×Optimized Ad
×Optimized Ad