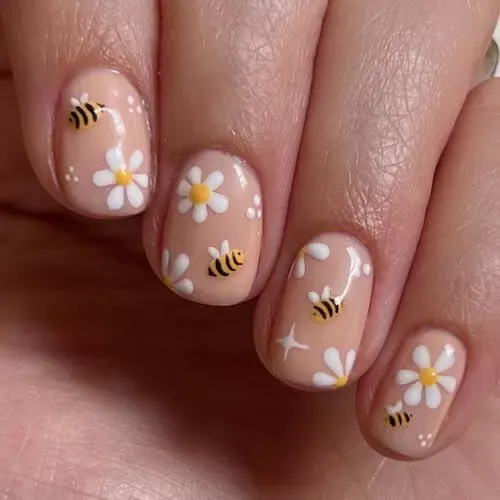
70+ Bee Nail Designs [2023] For Buzzworthy Nails
Are you looking to create some buzz with your nail art? Bee nail designs are the perfect choice for anyone who wants to show off their love for these adorable insects. Whether you prefer a subtle nod to bees or a more bold and vibrant look, there are endless possibilities when it comes to bee nail designs. In this article, we will provide you with over 70 bee nail design ideas that are sure to make your nails the talk of the town in 2023.
How to Achieve Bee Nail Designs
Creating bee nail designs may seem like a daunting task, but with the right tools and techniques, you can easily achieve stunning results. Here are some steps to help you create buzzworthy bee nail designs:
- Start by prepping your nails with a base coat to protect them and help the nail polish adhere better.
- Choose a yellow nail polish as the base color for your bee nail design. Apply two coats for full coverage.
- Using a nail art brush or a toothpick, create black stripes on your nails to mimic the look of a bee’s abdomen.
- Add black dots at the tip of your nails to represent the bee’s stinger.
- Finish off your bee nail design with a clear top coat to seal in the design and add shine.
70+ Bee Nail Design Ideas
Now that you know how to achieve bee nail designs, let’s dive into some inspiration for your next manicure. Here are over 70 bee nail design ideas that are perfect for any occasion:
- Classic yellow and black stripes
- Black and white honeycomb pattern
- 3D bee accents
- Gold foil bee wings
- Glittery bee designs
- Watercolor bee nail art
- French tip bee nails
- Matte bee nail designs
- Geometric bee patterns
- Abstract bee nail art
These are just a few ideas to get you started, but the possibilities are truly endless when it comes to bee nail designs. Feel free to get creative and customize your bee nail art to suit your personal style.
Tips for Maintaining Bee Nail Designs
Once you’ve created your buzzworthy bee nail designs, here are some tips to help you maintain them and keep your nails looking fabulous:
- Avoid using your nails as tools to prevent chipping or peeling of the nail art.
- Apply a fresh coat of top coat every few days to keep your bee nail designs looking fresh and glossy.
- Use cuticle oil regularly to keep your nails and cuticles hydrated and healthy.
- Avoid harsh chemicals or cleaning products that can damage your nail art.
- Visit a professional nail technician for touch-ups or repairs if needed.
With these tips in mind, you can enjoy your beautiful bee nail designs for weeks to come.
Conclusion
Bee nail designs are a fun and trendy way to show off your love for these adorable insects. With over 70 bee nail design ideas to choose from, you can easily create buzzworthy nails that are sure to turn heads in 2023. Whether you prefer a simple and classic look or a more intricate and detailed design, there is a bee nail design out there for everyone. So why wait? Get buzzing with your bee nail designs today!


Follow Us