Creating a Vintage Style Pop Art Effect in Photoshop
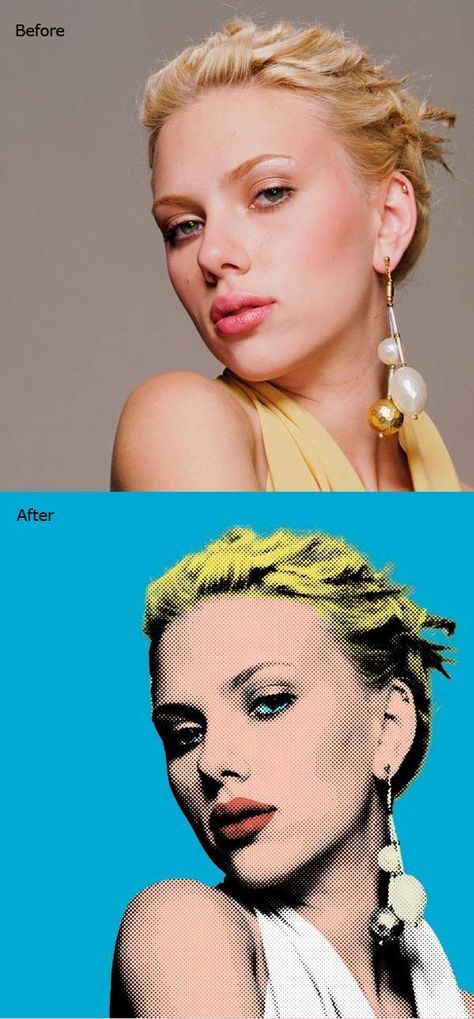
If you’re a fan of vintage pop art and want to recreate that iconic style in your own artwork, then this tutorial is for you. In this tutorial, we’ll walk you through the process of creating a vintage style pop art effect using Photoshop. You’ll learn how to use adjustments, filters, and the brush tool to mimic the pop art style and give your images a retro vibe.
Getting Started with Photoshop
First, open your image in Photoshop and make any necessary adjustments to the colors and tones. This will ensure that your final pop art effect looks its best. Once you’re happy with the overall look of your image, you can start adding the pop art effect.
Adding the Pop Art Effect
To begin adding the pop art effect, go to the “Filter” menu and select “Filter Gallery.” From the pop-up window, choose the “Halftone Pattern” filter. This filter will give your image a classic pop art look by adding dots or lines in varying sizes and patterns.
Adjust the settings of the Halftone Pattern filter to achieve the desired effect. You can play around with the size and contrast of the halftone pattern until you’re happy with how it looks on your image.
Creating Color Separations
Next, create color separations by duplicating your image and adjusting the colors of each duplicate. To do this, go to the “Image” menu and select “Adjustments” and then “Hue/Saturation.” Adjust the hue and saturation sliders to change the colors of each duplicate image. This step is essential to achieve the vibrant and bold colors that are characteristic of pop art.
Layer the colored duplicates on top of each other to create a layered effect. Adjust the opacity and blending modes of each layer to achieve the desired look. This will give your image a colorful and dynamic pop art effect.
Using the Brush Tool
To further enhance the vintage pop art effect, use the brush tool to add details and texture to your image. Choose a brush with a textured or grungy style and set the color to black. Using a low opacity, brush over the areas of your image to add depth and texture. This step will give your pop art effect a hand-drawn and vintage feel.
Adding Finishing Touches
Finally, add finishing touches to your vintage pop art effect by making any additional adjustments to the colors, tones, and contrast of your image. You can also add noise or grain to give your image a retro look. Once you’re happy with how your pop art effect looks, you can save your image and share it with the world.
In conclusion, creating a vintage style pop art effect in Photoshop is a fun and creative way to add a retro vibe to your images. By using adjustments, filters, and the brush tool, you can mimic the iconic pop art style and give your images a vibrant and dynamic look. Whether you’re a fan of vintage pop art or just looking to try something new in Photoshop, this tutorial will guide you through the process of creating your own vintage pop art masterpiece. With a little practice and experimentation, you’ll be able to create stunning vintage pop art effects that are sure to impress.
You can review our digital products by following us on Etsy.


