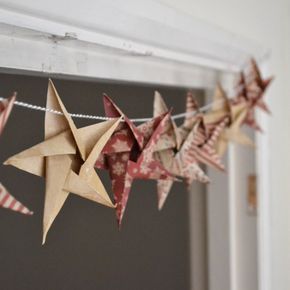

Origami Star Garland: A Beautiful DIY Christmas Decoration
Origami is the traditional Japanese art of paper folding, and it’s a fun and inexpensive way to create beautiful decorations for your home. In this tutorial, we’ll show you how to make a simple origami star and then string them together to create a stunning star garland. This DIY project is perfect for adding a festive touch to your Christmas decorations, and it’s also a great activity to do with kids.
Materials Needed
To get started, you’ll need a few basic supplies:
– Origami paper or any square paper
– Scissors (if using regular paper)
– String or ribbon
– Optional: glitter, markers, or paint for decorating
Step 1: Fold the Paper
1. Start with a square piece of paper. If you’re using regular printer paper, start by cutting it into a square.
2. Fold the paper in half diagonally to form a triangle, then unfold.
3. Next, fold the paper in half diagonally in the opposite direction to create another triangle, then unfold.
4. Flip the paper over to the other side.
Step 2: Create the Basic Folds
5. Fold the paper in half horizontally, then unfold.
6. Fold the paper in half vertically, then unfold.
Step 3: Create the Star Points
7. Using the previous folds as a guide, bring the top corner of the paper down to the center point, crease, and unfold.
8. Then, bring the top corner of the paper down to the crease you just made, creating a smaller triangle at the top.
9. Repeat this process for the other three corners of the paper, creating four smaller triangles on top of the larger one.
Step 4: Shape the Star
10. Fold the top point of each triangle down to meet the bottom edge.
11. Flip the paper over and repeat on the other side.
12. The paper now looks like a square with flaps on each corner.
Step 5: Assemble the Stars
13. Create as many stars as you’d like for your garland. If you’d like, decorate the stars with glitter, markers, or paint before continuing.
Step 6: String the Garland
14. Once you have your stars, thread a piece of string or ribbon through one of the flaps on the back of each star.
15. Leave a few inches of space between each star as you thread them onto the string.
16. Continue threading the stars onto the string until you have reached your desired length for the garland.
17. Tie a knot at each end of the string to secure the stars in place.
Step 7: Hang and Enjoy
18. Once you’ve finished assembling your star garland, find a suitable place to hang it in your home.
19. You can hang it on a Christmas tree, above a fireplace, or drape it along a mantel or staircase for a festive touch.
20. Step back and admire your beautiful handmade decoration.
Origami star garlands are a simple yet charming way to add a personal touch to your Christmas decor. Whether you’re a seasoned origami pro or trying it out for the first time, this project is easy enough for anyone to enjoy. So gather your supplies and get folding. Your home will be looking merry and bright in no time!
You can review our digital products by following us on Etsy.


