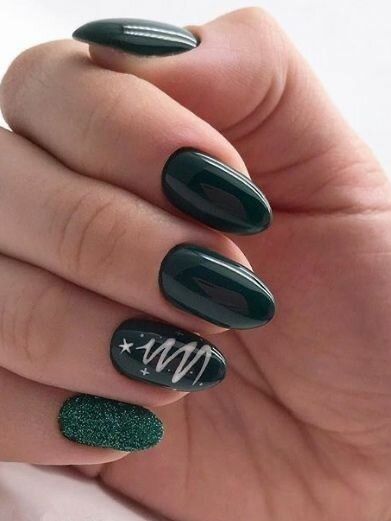
1. Festive Red and Green Christmas Tree Nails
For a classic and festive holiday nail look, start by painting your nails with a vibrant red polish. Once the red polish is dry, use a thin nail art brush to create green Christmas tree shapes on each nail. You can add small gold or silver nail gems to the trees as ornaments for an extra festive touch. Finish off the look with a clear top coat to seal in the design and add shine.
2. Glittery Christmas Tree Accent Nail
For a subtle yet eye-catching Christmas tree nail design, paint your nails with a sparkly silver or gold polish. Then, choose one nail on each hand to be your accent nail. Use a thin nail art brush to create a simple Christmas tree design on the accent nail using green polish. You can also add small dots of red or gold polish to mimic ornaments on the tree. Finish the look with a clear top coat to make the design pop.
3. Snowy Christmas Tree Nails
To create a wintery Christmas tree nail look, start by painting your nails a light, icy blue color. Once the blue polish is dry, use a thin nail art brush to create snowy Christmas trees on each nail using white polish. You can add small silver or iridescent nail gems as snowflakes or ornaments on the trees. Finish the look with a matte top coat to give it a frosted appearance.
4. 3D Christmas Tree Nail Charms
For a fun and unique Christmas tree nail look, consider adding 3D nail charms to your manicure. Start by painting your nails with a neutral or light-colored polish as a base. Then, use nail glue to adhere small Christmas tree nail charms to each nail. You can also add small rhinestones or glitter accents to the design for extra sparkle. Finish off the look with a clear top coat to secure the charms in place.
5. Ombre Christmas Tree Nails
To achieve a trendy ombre Christmas tree nail look, start by painting your nails a dark green polish at the base and gradually fade it into a lighter shade towards the tips. Once the ombre effect is complete, use a thin nail art brush to create Christmas tree designs on each nail using a darker green polish. You can also add small dots of red or gold polish as ornaments on the trees. Finish the look with a glossy top coat to smooth out the ombre transition and add shine.
6. Stamped Christmas Tree Nails
If you’re looking for an easy way to create Christmas tree nails, consider using nail stamping plates. Start by painting your nails with a neutral or light-colored polish as a base. Then, use a Christmas tree design stamp and green polish to stamp the tree onto each nail. You can add small red, gold, or silver accents to the design to make it pop. Finish off the look with a clear top coat to seal in the design and add shine.
7. Extravagant 3D Christmas Tree Nail Art
For those who want to go all out with their Christmas tree nails, consider getting 3D nail extensions or using acrylic nail art to create intricate Christmas tree designs. There are many nail technicians and salons that specialize in 3D nail art and can create elaborate Christmas tree nail designs with sculpted acrylics, nail charms, and other embellishments. This option may require a professional nail technician’s help, but the result will be a show-stopping holiday manicure.
Overall, there are countless ways to create cute Christmas tree nails to nail your holiday look. Whether you prefer a classic red and green design or want to go for something more extravagant, there’s a Christmas tree nail look for everyone. Have fun experimenting with different techniques and designs to find the perfect holiday manicure that suits your style.
You can review our digital products by following us on Etsy.


