Step 1: Prepare Your Nails
Before getting started on your festive Christmas and holiday nails, make sure to prep your nails by trimming, shaping, and buffing them. Clean your nails and apply a base coat to protect them from staining and help the nail polish adhere better.
Step 2: Red Base Coat
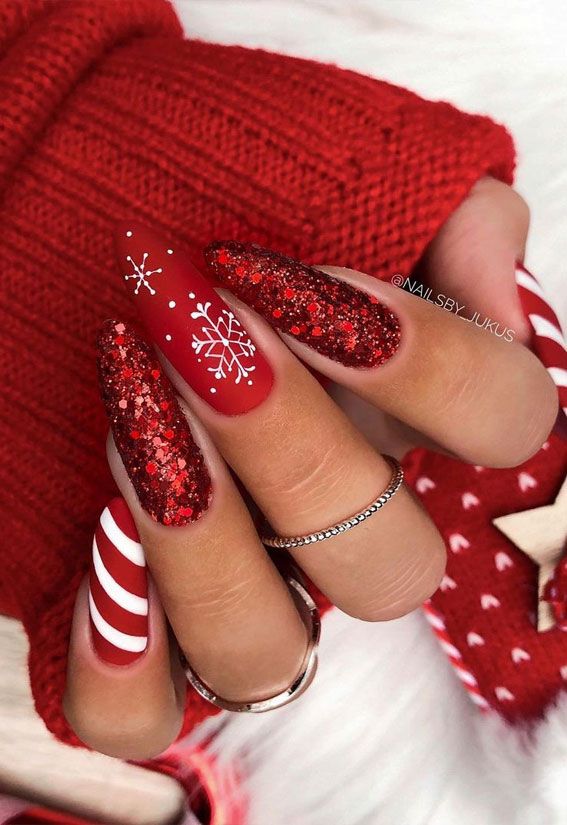
Apply a red base coat to your nails. This will serve as the background for your snowflake design. Make sure to apply two thin and even coats for full coverage and allow each coat to dry completely before moving on to the next step.
Step 3: White Snowflakes
Using a thin nail art brush or a nail art pen, carefully create white snowflake designs on each nail. You can opt for different snowflake patterns on each nail or keep them uniform for a cohesive look. If you’re not confident in your freehand skills, you can also use snowflake nail stickers or stencils for a flawless design.
Step 4: Glitter and Rhinestones
To add a festive touch to your snowflake nails, consider adding some glitter or rhinestones to accentuate the design. You can apply a fine dusting of silver or white glitter over the entire nail or strategically place rhinestones on the snowflake centers for a sparkling effect.
Step 5: Top Coat
Once you’re satisfied with your snowflake and red Christmas nails, apply a top coat to seal in your design and add shine. This will also help protect your nail art and prevent chipping, allowing you to enjoy your festive nails throughout the holiday season.
Festive Christmas Nails Ideas
When it comes to festive Christmas and holiday nails, the possibilities are endless. Here are some additional ideas to inspire your nail art creativity:
- Christmas Tree Nails: Create adorable Christmas tree designs using green nail polish and decorating them with tiny ornaments and a star on top.
- Candy Cane Nails: Embrace the classic candy cane colors of red and white with striped nail art or a candy cane accent nail.
- Santa Claus Nails: Show off your love for Santa with nail art featuring his iconic red suit, white beard, and black belt buckle.
- Holiday Sweater Nails: Mimic the look of cozy holiday sweaters with intricate nail designs featuring snowflakes, reindeer, and other festive patterns.
- Gold and Silver Nails: For a glamorous look, incorporate metallic gold and silver polishes, as well as glitter and metallic nail decals.
Tips for Long-Lasting Christmas Nails
To keep your festive Christmas and holiday nails looking perfect throughout the season, consider the following tips:
- Use a high-quality base coat to protect your nails and prevent staining from dark or bold nail polish colors.
- Apply thin layers of nail polish to prevent bubbling and ensure smooth, even coverage.
- Allow each layer of nail polish to dry completely before applying the next coat or design elements to avoid smudging or smearing.
- Seal your nail art with a top coat to add shine, protect your design, and extend the longevity of your manicure.
- Be mindful of your nails in daily activities to avoid chipping or damage, and consider using gloves when doing chores or working with your hands.
Final Thoughts
With these tips and ideas, you can create gorgeous and festive Christmas and holiday nails that are sure to turn heads and spread cheer throughout the season. Whether you opt for snowflake and red Christmas nails or explore other creative designs, have fun and let your nail art reflect the joy and magic of the holidays.
You can review our digital products by following us on Etsy.


